Spring Boot - Filter, interceptor, aop
요약
Filter는 Servlet Container에서 웹 요청을 가로채고 처리하는데 사용되는 클래스이며,
Interceptor는 Spring MVC에서 Controller의 요청 전후에 실행되는 클래스이고,
AOP(Aspect Oriented Programming)은 관심사를 모듈화하여 재사용성을 높이는 프로그래밍 패러다임이다.
사용자 요청 발생 시 동작 순서
사용자 요청 -> Filter -> DispatcherServlet -> Handler Mapping -> Interceptor -> AOP -> Controller (handler) -> AOP -> Interceptor -> DispatcherServlet -> Filter -> 응답
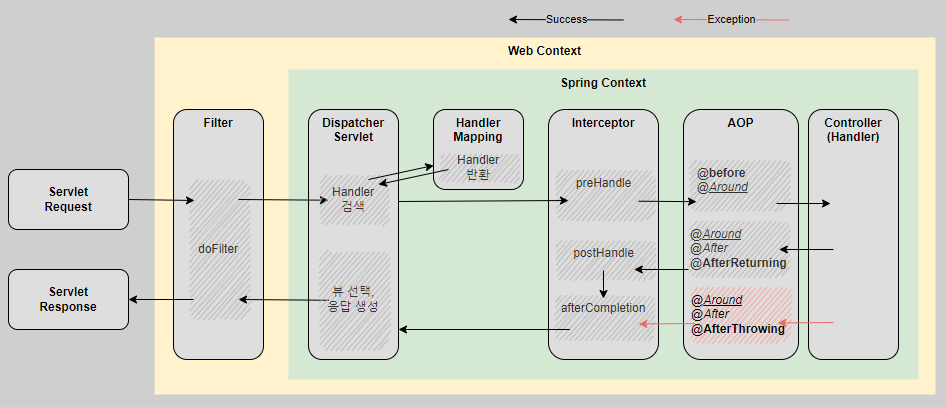
Filter
- Filter는 Dispatcher Servlet 이전에 위치하여 엔드포인트로 접근하려는 데이터를 가장 먼저 확인할 수 있으며 데이터를 로깅하거나 암호화 및 복호화할 수 있다.
- Filter는 Spring Context에 속하지 않고 Web Context에 속하지만
@Component어노테이션을 통해 spring에서 bean으로 관리되기 때문에 Spring Context를 주입받아 사용할 수 있다.
LoggerFilter 만들기
간단하게 모든 request 데이터와 response 데이터를 console에 로그로 출력하는 filter를 생성
1. jakarta.servlet.Filter 인터페이스를 구현한다.
- import jakarta.servlet.Filter;
- implements Filter
2. ContentCachingRequestWrapper, ContentCachingResponseWrapper 사용
ServletRequest를 ContentCachingRequestWrapper로 변환
ServletResponse를 ContentCachingResponseWrapper로 변환
Filter의 doFilter() 메서드를 구현하면 매개변수로 ServletRequest와 ServletResponse를 받게 되는데, 이를 각각 ContentCachingRequestWapper와 ContentCachingResponseWrapper로 변환한 후 사용하면 사용자 입력 값과 서버 응답 값을 버퍼링하여 값을 로깅하는데에도 사용할 수 있게 된다.
request 데이터와 response 데이터는 filterChain.doFilter(request, response) 호출 후에 사용
로깅을 위해 request 데이터와 response 데이터를 사용하려면filterChain.doFilter(request, response);가 호출된 다음에 사용해야 한다.
왜냐하면 response 데이터는 controller의 반환값이기 때문에 filterChain.doFilter(request, response)메서드가 실행 되어야 생성되고, request 데이터의 경우 filterChain.doFilter(request, response) 이전에 호출하게 되면 버퍼에서 데이터를 꺼내 쓰게 되어 controller에 전달되는 request값이 없게 되기 때문이다. 그래서 filterChain.doFilter(request, response)를 호출한 후에 값을 조회해야 한다.
Filter.doFilter() 메서드가 종료되기 전에
response.copyBodyToResponse()를 호출하여 버퍼링 된 데이터를 response로 전달
request의 경우 filterChain.doFilter(request, response);를 호출하면서 값이 controller에 전달됨으로써 본래 역할이 종료되지만 response의 경우 controller에서 사용자에게 보여주기 위한 응답값이 들어있는 상태이기 때문에 filterChain.doFilter(request, response) 호출 이후에 값을 조회했다면 doFilter()메서드가 끝나기 전에response.copyBodyToResponse();를 호출하여 버퍼링 된 응답 데이터를 response객체에 전달하는 작업을 진행해야 사용자 화면에 응답값이 출력된다.- ContentCachingResponseWrapper.copyBodyToResponse() 발췌
1
2
3
4
5
6
7
8
9
10
11
12
13
14
15
16
17
18
19
20
21
22
23
24
25
26
  protected void copyBodyToResponse(boolean complete) throws IOException {
       if (this.content.size() > 0) {
           HttpServletResponse rawResponse = (HttpServletResponse)this.getResponse();
           if (!rawResponse.isCommitted()) {
               if (complete || this.contentLength != null) {
                   if (rawResponse.getHeader("Transfer-Encoding") == null) {
                       rawResponse.setContentLength(complete ? this.content.size() : this.contentLength);
                   }

                   this.contentLength = null;
               }

               if (complete || this.contentType != null) {
                   rawResponse.setContentType(this.contentType);
                   this.contentType = null;
               }
           }

           this.content.writeTo(rawResponse.getOutputStream());
           this.content.reset();
           if (complete) {
               super.flushBuffer();
           }
       }

   }
- ContentCachingResponseWrapper.copyBodyToResponse() 발췌
3. LoggerFilter
1
2
3
4
5
6
7
8
9
10
11
12
13
14
15
16
17
18
19
20
21
22
23
public class LoggerFilter implements Filter {

    @Override
    public void doFilter(ServletRequest servletRequest, ServletResponse servletResponse, FilterChain filterChain) throws IOException, ServletException {
        log.info("---- `Filter` in -->>>>");

        var request  = new ContentCachingRequestWrapper((HttpServletRequest) servletRequest);
        var response = new ContentCachingResponseWrapper((HttpServletResponse) servletResponse);

        filterChain.doFilter(request, response);

        String requestJson = new String(request.getContentAsByteArray());
        log.info("✅ request: {}", requestJson.replaceAll("[\n\r ]", ""));

        String responseJson = new String(response.getContentAsByteArray());
        log.info("✅ response: {}", responseJson);

        response.copyBodyToResponse();

        log.info("<<<<--- `Filter` out ------");
    }

}
Interceptor
- Dispatcher Servlet과 Controller 사이에 존재한다.
- Handler Mapping을 통해 Controller (handler)가 정해지면 Interceptor로 정보가 들어온다.
- Interceptor는 Spring Context에 속하기 때문에 Spring context에 접근할 수 있다.
- Interceptor에는 전처리를 수행할 수 있는
preHandle()메서드와
후처리를 수행할 수 있는postHandle()메서드 그리고afterCompletion()메서드가 있다.
preHandle()
Controller에 도달하기 전에 로직을 수행할 수 있는 메서드.
preHandle()에서 로직을 통해 조건에 맞지 않으면 false를 반환하여 controller에 도달하지 못하게 할 수 있다.
💡 HandlerMethod
preHandle() 메서드의 매개변수 중 Object handler를 HandlerMethod로 변환하면 도달하고자 하는 컨트롤러나 메서드에 특정 어노테이션이 존재하는지 확인할 수 있고 Bean 이름, Method 정보, Method Parameter 정보, Method Return Type 등에 대해 알 수 있다.
1
2
3
4
5
6
7
8
9
10
11
12
13
14
15
16
17
18
19
20
21
22
23
24
25
26
27
28
29
30
31
32
33
34
35
36
37
38
39
@Override
public boolean preHandle(HttpServletRequest request, HttpServletResponse response, Object handler) throws Exception {
    // `controller`에 도달하기 전에 동작
    log.info("┌------ pre handle ------┐");

    HandlerMethod handlerMethod = (HandlerMethod) handler;

    // ex. kim.zhyun.filter.controller.UserApiController@77ff884c
    log.info("✅ Bean: {}", handlerMethod.getBean());

    // ex. public kim.zhyun.filter.model.UserRequest kim.zhyun.filter.controller.UserApiController.register(kim.zhyun.filter.model.UserRequest)
    log.info("✅ Method: {}", handlerMethod.getMethod());

    // ex. kim.zhyun.filter.model.UserRequest userRequest
    Arrays.stream(handlerMethod.getMethod().getParameters())
            .forEach(param -> log.info("✅ Method Parameter: {}", param));

    // ex. class kim.zhyun.filter.model.UserRequest
    log.info("✅ Return Type: {}", handlerMethod.getMethod().getReturnType());

    // 메서드가 해당 어노테이션을 가지고 있는지 확인
    OpenApi methodLevel = handlerMethod.getMethodAnnotation(OpenApi.class);
    if (methodLevel != null) {
        log.info("✅ method level");
        log.info("└------------------------┘");
        return true;
    }

    // 클래스가 해당 어노테이션을 가지고 있는지 확인
    OpenApi classLevel = handlerMethod.getBeanType().getAnnotation(OpenApi.class);
    if (classLevel != null) {
        log.info("✅ class level");
        log.info("└------------------------┘");
        return true;
    }
    log.info("✅ open api 아닙니다. : {} {}", request.getMethod(), request.getRequestURI());
    log.info("└------------------------┘");
    return false;
}
postHandle()
interceptor가 controller의 handler 메서드를 실행한 후, 뷰를 렌더링 하기 전에 호출되는 메서드이다.
만약 controller의 handler 메서드 실행 중 예외가 발생한다면 postHandle() 메서드는 호출되지 않는다.
postHandle() 메서드는 매개변수로 ModelAndView를 받는데, ModelAndView를 이용해서 뷰를 변경하거나 모델 데이터를 추가해 줄 수 있다. ModelAndView를 이용하면 권한 검사 후 특정 권한이 없는 경우 다른 뷰를 보여주는 것과 같은 작업을 수행할 수 있다.
afterCompletion()
controller의 handler 메서드가 실행을 완료하면 호출된다.
예외가 발생해도 afterCompletion() 메서드는 호출되며 매개변수로 Exception을 받기 때문에 handler 메서드에서 발생한 exception을 이용한 작업을 추가할 수도 있다.
AOP
핵심 비즈니스 로직을 건드리지 않고 애플리케이션의 여러부분에 걸쳐 관심사를 모듈화하는 데 사용된다. 이를 통해 코드의 재사용성을 높이고 관심사의 분리를 통해 코드를 더 깔끔하게 유지할 수 있다. AOP의 예시로 암호화 되어 있는 내용을 복호화 한다던지, 평문을 암호화 한다던지, API 속도 로깅을 비즈니스 코드 외부에서 일괄적으로 적용시키는 등의 방법으로 사용 할 수 있다.
AOP 구성 요소
1. @Aspect
- AOP에서 관심사를 정의하는 모듈임을 표시하는 어노테이션.
- 특정한 관심사 (로깅, 보안, 트랜잭션 관리 등)를 정의하고 해당 관심사를 어디에서 적용할 것인지 정의한다.
2. JoinPoint
- 애플리케이션 실행 중에 Aspect가 적용 될 수 있는 특정한 지점을 가리킨다.
- 메서드 호출, 예외 발생 등이 해당될 수 있다.
3. Advice
- JoinPoint에서 실행되는 코드
@Before- 메서드 실행 전에 실행된다.
@AfterReturning- 메서드가 정상적으로 반환된 후 실행된다.
@AfterThrowing- 메서드가 예외를 던진 후 실행된다.
@After- 메서드가 정상적으로 반환되거나 예외가 발생해도 실행된다.
- @AfterReturning, @AfterThrowing 동작을 포함하는 형태
@Around- 메서드 실행 전에 실행되며 메서드 호출을 직접 제어할 수 있다.
- JoinPoint 메서드에 반환값이 있는데 @Around에서 반환값을 명시적으로 반환하지 않는다면 joinPoint 메서드에서 생성된 반환값은 AOP에서 끝난다.
예를 들어 joinPoint가 RestController의 handler 메서드인 경우, dto를 반환하고 있는데 @Around에서 joinPoint의 반환값을 명시하지 않으면 dto는 사용자 화면에 보여지지 않게 된다. - @Before, @After (@AfterReturning + @AfterThrowing) 동작을 포함하는 형태
4. @Pointcut
- advice를 적용할 조인 포인트의 집합을 정의한다.
- 포인트컷은 특정한 메서드 호출, 패키지, 클래스 등과 같은 조인 포인트를 선택하는데 사용한다.
포인트컷 지시자 Pointcut Designators
공식 문서 : https://docs.spring.io/spring-framework/reference/core/aop/ataspectj/pointcuts.htm
- 1. excution : 접근제한자, 반환타입, 클래스타입, 메서드, 파라미터 기준으로 지정
1
@Pointcut("execution([접근제한자] 반환타입 패키지.클래스 메서드 매개변수)")
각각의 패턴은
*로 표현이 가능하며,..은 0개 이상을 의미
1.1) 접근제한자 (생략 가능)
접근제한자 설명 예시 publicpublic 제한자 execution(public privateprivate 제한자 execution(private 생략 모든 제한자 execution(
1.2) 반환타입반환타입 설명 예시 *모든 리턴 타입 execution(public * void리턴 타입이 void인 메서드 execution(public void !void리턴 타입이 void가 아닌 메서드 execution(public !void
1.3) 패키지 지정패키지 지정 설명 예시 com.example.*example 패키지 하위의 모든 패키지 execution(public * com.example.* com.example..example로 시작하는 패키지 execution(public * com.example.. com.example..implexample 패키지 하위의 imple로 끝나는 패키지 execution(public * com.example..impl com.example.controllercom.example.controller 패키지만 지정 excution(public * com.example.controller
1.4) 클래스 지정클래스 지정 설명 예시 FooFoo 클래스 지정 execution(public * com.example.*.Foo *ApiController이름이 ApiController로 끝나는 클래스 execution(public * com.example.*.*ApiController
1.5) 메서드 지정메서드 지정 설명 예시 *(..)모든 메서드 execution(public * com.example.*.Foo *(..)) set*(..)set으로 시작하는 모든 메서드 execution(public * com.example.*.Foo set*(..)) foo(..)이름이 foo인 메서드 execution(public * com.example.*.Foo foo(..))
1.6) 메서드 매개변수 지정매개변수 지정 설명 예시 (..)매개변수가 0개 이상execution(public * com.example.*.Foo *(..)) (*)매개변수가 1개execution(public * com.example.*.Foo *(*)) (String)매개변수가 1개면서 타입이 Stringexecution(public * com.example.*.Foo *(String)) (com.example.dto.UserDto)매개변수가 1개면서 타입이 com.example.dto.UserDtoexecution(public * com.example.*.Foo *(com.example.dto.UserDto)) (!com.example.dto.UserDto)매개변수가 1개 이하면서 타입이 com.example.dto.UserDto가 아님execution(public * com.example.*.Foo *(!com.example.dto.UserDto)) (String, ..)매개변수가 2개 이상이면서 첫번째 매개변수가 String 타입execution(public * com.example.*.Foo *(String, ..)) (String, *)매개변수가 2개면서 첫번째 매개변수가 String 타입execution(public * com.example.*.Foo *(String, *))
- 2. within : 특정 경로의 타입을 기준으로 지정
1
@Pointcut("within(경로)")
예시 설명 within(com.example.dto.*) com.example.dto 패키지의 모든 메서드 지정 within(com.example.dto..*) com.example.dto 패키지 하위의 모든 패키지의 모든 메서드 지정 within(com.example.dto.UserService) com.example.dto.UserService 클래스의 모든 메서드 지정
- 3 . bean
1
@Pointcut("bean(bean이름)")
예시 설명 bean(userService) UserServoce bean의 모든 메서드
- 4 . @target
1
@Pointcut("@target(어노테이션경로)")
예시 설명 @target(com.example.annotation.PhoneNumber) PhoneNumber 어노테이션이 붙은 클래스
- 5 . @within
1
@Pointcut("@within(어노테이션경로)")
예시 설명 @within(com.example.annotation.Controller) Controller 어노테이션이 붙은 클래스
- 6 . @annotation
1
@Pointcut("@annotation(어노테이션경로)")
예시 설명 @annotation(com.example.annotation.PhoneNumber) PhoneNumber 어노테이션이 붙은 메서드@annotation(PhoneNumber) PhoneNumber 어노테이션이 붙은 메서드
- 7 . @args
1
@Pointcut("@args(어노테이션경로)")
예시 설명 @args(com.example.annotation.PhoneNumber) PhoneNumber 어노테이션이 붙은 매개변수
TimerAOP 구현해보기
UserApiController의 핸들러 메서드의 실행 시간을 측정해보는 TimerAop를 구현
1. TimerAop 클래스 생성
1
2
3
4
5
6
@Slf4j
@Aspect
@Component
public class TimerAop {

}
2. Pointcut 정의
1
2
@Pointcut(value = "within(kim.zhyun.filter.controller.UserApiController)")
public void pointCut() {}
3. Advice 구현
메서드 실행 전과 후에 실행되는 @Around 어드바이스를 이용하여 핸들러 메서드의 실행 시간을 측정하고 로그로 출력한다.
1
2
3
4
5
6
7
8
9
10
11
12
13
14
15
16
17
18
19
20
21
22
23
24
25
26
27
28
29
30
31
32
33
@Around(value = "pointCut()")
public UserRequest around(ProceedingJoinPoint joinPoint) throws Throwable {
	Object result;

	// joinPoint.getArgs(); : joinPoint 된 메서드에 들어오는 모든 매개변수 확인
	List<Object> newObjs = Arrays.stream(joinPoint.getArgs())
		.map(it -> {
			if (it instanceof UserRequest tempUser) {
				String ph = tempUser.getPhoneNumber().replace("-", "+");
				tempUser.setPhoneNumber(ph);
			}
			return it;
		}).toList();

	StopWatch stopWatch = new StopWatch();
	stopWatch.start();

	try {
		// 메서드 실행! 위에서 변조한 데이터 newObjs를 메서드에 전달한다.
		result = joinPoint.proceed(newObjs.toArray());
	} catch (Throwable e) {
		log.info("⚠️ exception: {}", e.getMessage());
		throw e;
	}

	stopWatch.stop();

	log.info("✅ 총 소요된 시간: {}ns", stopWatch.getTotalTimeNanos());
	log.info("✅ 총 소요된 시간: {}ms", stopWatch.getTotalTimeMillis());
	log.info("✅ 총 소요된 시간: {}s", BigDecimal.valueOf(stopWatch.getTotalTimeSeconds()));

	return (UserRequest) result;
}
참고한 사이트